
Decorative Concrete Tuscan Slate Brick Boarder Antique Taupe Patio Custom Concrete Lake Ozark
Hey this is Rick with custom concrete design at Lake of the Ozarks. This week we are in Westphalia Missouri. We’re, going to be doing this patio right here. It’s about a thousand square feet wraps around the other side of the house over there, but we’re just going to come to this cold joint.
We’re, going to stay to the left side of it. We’ve already started doing the grinding. As you tell there, you can probably see a lot of the white drain marks where we’ve been, but those those are where the cracks are.
How will you guys can see this on a video or not? It’s kind of hard for me to tell exactly where it’s at till the Sun and shadows here, but there’s, some repairs that have to be done right here along this cold joint there’s another pretty good-sized crack right here on the corner.
It’s, not long, but it’s kind of wide. This is probably the worst one that we’ve got this just wraps on around where there’s a couple more cracks over here. You business owners pinning him between a desk and a vehicle show.
This job here in Westphalia Missouri, is now complete. We’ve got our brick borders everywhere, camouflaged our joint lines, Tuscan slate texture, finish: colors are taupe a little bit darker on the base coat a bit lighter on the topcoat.
Then we sprayed it with some antiquing stain same color, taupe spray, the border. All the brick, I should say, sprayed it through our hopper gun and we hand painted quite a few bricks, while we have various colors shine on it, a little bit closer view here.
Take you to my Facebook page. You can check that out and also take you to my website. Entryways. Looking good [ Music ] see you guys on the next project:
Please subscribe to My YouTube Channel and uh like the video. If you like it, leave me a comment. Let me know what you think and hit that little bell, so you stay subscribed to my videos. Uh links are below to my facebook page and my website, where you can get more information.
All right see you guys on the next one.
Hope you Enjoy the pictures and Video
MORE pictures located HERE!!
Call me for a FREE Estimate.
OR – You can Fill out this Convenient Contact form located HERE and I will Contact YOU!!
Thank you for Visiting My Website, come back again soon….
Rick LaFata
(573)-216-0930
rick@customconcretedesign.info
Custom Concrete Design
![]()
![]()
![]()
![]()
![]()
![]()
![]()
![]()

Decorative Concrete – Tuscan Slate Antique Chocolate Interior Flooring Lake Ozark
Hey this is Rick with custom, concrete design in Lake of the Ozarks Missouri. This week we’re over here in Eldon, we’re gonna be working on this kitchen dining room area. In here we’ve got to take and pull up this linoleum here, and this is basically their little office area right here, not sure what that area there’s for washer and dryer kind of a laundry room office area.
So we’re gonna pull all this up and do this whole area as well, and here’s, their dining room area can ‘ T really tell how good it come. Gon na shape the concrete’s in just because mainly we’ve got it still crying.
What what’s here, we’re gonna grind it off grind it down, grind it off and then kind of see what’s underneath this glue, I may have some cracks. I know there’s already a couple little spalled areas that we’ve got to repair, but we’re getting the ground down.
Now I still got to go around all the edges and pull up that linoleum there and then in here we ‘ Ve got some quarter-round that we ‘ Ve got to pull off the baseboards because we’re gonna. Do this entryway here into that closet there, so we’re gonna get started.
Okay, I’m gonna make this one real, quick. We basically have the prep work all done all the grinding cracks repaired. Spall’s! Carpet holes all of its repaired so right now we’re, just mixing up some concrete and we’re gonna put on our.
I should place slow it down a little bit. We’re gonna put on our first base coat, but, as you can tell it’s ready to go nice clean, you know we had all that linoleum that had to be pulled up and glue, and so we had a couple Of days of prep work, but you just never know when your opponents, you know another flooring off at the top of your concrete which what you have below.
So we had to give this a couple days: uh two days of prep, so first bucket of base coat dark, chocolate is down at the kitchen, dining room is done and laundry room is done, but we got about half the kitchen and there’s.
Ever stopped, so we’re mixing up a bucket now – and I finish this out. Okay, we got this job complete came in here. We had to pull up some linoleum find everything down, get all the glue off make some repairs.
Some pop marks pulls back, got it all up there, a couple of base coats down little dark chocolate and that’s, the dark you’re. Seeing and then we get a Tuscan, suede texture finish, and then we sprayed it down with an antique chocolate stain and yesterday we came in and came in and put a clear coat of the epoxy over the top of it.
It’s, a nice high-gloss epoxy. They’ll, not shine more to fast 20 reflections along. If you guys are watching this on youtube. Please subscribe to my channel, like the video hit that little thumbs up down there.
If you like it and then leave me a comment, let me know what you think: if you’re watching this on my website, then you can always click over and watch it on YouTube and get subscribed to my channel. So you don’t miss any of my videos and there should be a couple of links underneath this video to it’ll.
Take you to my Facebook page. You can check that out and also take you to my website. Entryways. Looking good see you guys on the next project: [ Music, ], hey! This is Rick with custom, concrete design in Lake of the Ozarks Missouri.
This week we’re over here in Eldon, we’re gonna be working on this kitchen. Dining room area in here we’ve, got to take and pull up this linoleum here, and this is basically their little office area right here, not sure what that area.
There’s for washer and dryer kind of a laundry room office area, so we’re gonna pull all this up and do this whole area as well, and here’s, their dining room area can’T really tell how good it come. Gon na shape the concrete’s in just because mainly we’ve got it still crying.
What what’s here, we’re gonna grind it off grind it down. Grind it off and then kind of see what’s underneath this glue I may have some cracks. I know there’s already, a couple little spalled areas that we’ve got to repair, but we’re.
Getting the ground down now, I still got to go around all the edges and pull up that linoleum there and then in here we ‘ Ve got some quarter-round that we ‘ Ve got to pull off the baseboards because we’re gonna.
Do this entryway here into that closet there. So we’re gonna get started. Okay, I’m gonna make this one real quick. We basically have the prep work, all done all the grinding cracks repaired. Spall’s, carpet holes all of its repaired.
So right now we’re, just mixing up some concrete and we’re gonna put on our. I should place slow it down a little bit. We’re gonna put on our first base coat, but, as you can tell it’s ready to go nice clean, you know we had all that linoleum that had to be pulled up and glue, and so we had a couple Of days of prep work, but you just never know when your opponents, you know another flooring off at the top of your concrete which what you have below.
So we had to give this a couple days: uh two days of prep, so [, Music, ]. First bucket of base coat dark, chocolate is down at the kitchen, dining room is done and laundry room is done, but we got about half the kitchen and there’s ever stopped.
So we’re mixing up a bucket now – and I finish this out: [ Music, ]. Okay, we got this job complete came in here. We had to pull up some linoleum, find everything down, get all the glue off make some repairs.
Some pop marks pulls back, got it all up there, a couple of base coats down little dark chocolate and that’s, the dark you’re. Seeing and then we get a Tuscan, suede texture finish, and then we sprayed it down with an antique chocolate stain and yesterday we came in and came in and put a clear coat of the epoxy over the top of it.
It’s, a nice high-gloss epoxy. They’ll, not shine more to fast [, Music, ], [, Music, ] 20 reflections along [, Music, ], [, Music ] – if you guys are watching this on youtube. Please subscribe to my channel, like the video hit that little thumbs up down there.
If you like it and then leave me a comment, let me know what you think. If you’re watching this on my website, then you can always click over and watch it on YouTube and get subscribed to my channel. So you don’t miss any of my videos and there should be a couple of links underneath this video to it’ll.
Take you to my Facebook page. You can check that out and also take you to my website. Entryways. Looking good [ Music ] see you guys on the next project:
Please subscribe to My YouTube Channel and uh like the video. If you like it, leave me a comment. Let me know what you think and hit that little bell, so you stay subscribed to my videos. Uh links are below to my facebook page and my website, where you can get more information.
All right see you guys on the next one.
Hope you Enjoy the pictures and Video
MORE pictures located HERE!!
Call me for a FREE Estimate.
OR – You can Fill out this Convenient Contact form located HERE and I will Contact YOU!!
Thank you for Visiting My Website, come back again soon….
Rick LaFata
(573)-216-0930
rick@customconcretedesign.info
Custom Concrete Design
![]()
![]()
![]()
![]()
![]()
![]()
![]()
![]()
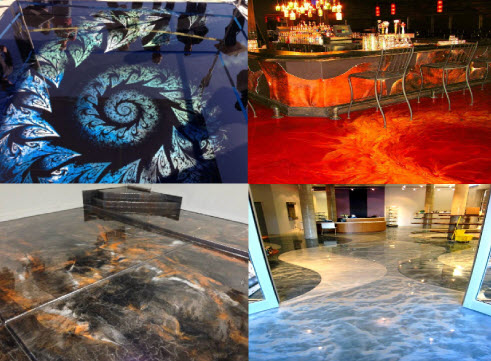
SWEET Decorative Concrete Artwork done to any Concrete Surface Inside or Outside!!
Who Would like to have an Amazing Garage Floor, Man Cave Basement, Kitchen Floor, Front Stoop, Pool Deck, Driveway etc…., or just some SWEET Decorative Concrete Artwork done to any Concrete Surface INSIDE or OUTSIDE??…. COMMENT BELOW!!
Call me for a FREE Estimate.
OR – You can Fill out this Convenient Contact form located HERE and I will Contact YOU!!
Thank you for Visiting my Website, come back again soon….
Rick LaFata
(573)-216-0930
rick@customconcretedesign.info
Custom Concrete Design
![]()
![]()
![]()
![]()
![]()
![]()
![]()
![]()
Decorative Concrete Lakeside Patio Deck with Acid Stain in Laurie, MO
With this patio we started out with a pretty good slab of concrete, it had 3 cracks running from the house all the way to the railing, we of course repaired them did a little grinding (just a few rough spots nothing major) and started our Overlay Process.
We did our usual prep work to begin which is always the grinding and repairs, then we go in with a Muriatic Acid wash then an Ammonia Rinse, followed by a soft water rinse, then we hammer the concrete with our 4000 PSI pressure washer and really get those pours of the concrete wide open for our overlay material.
Taped up ever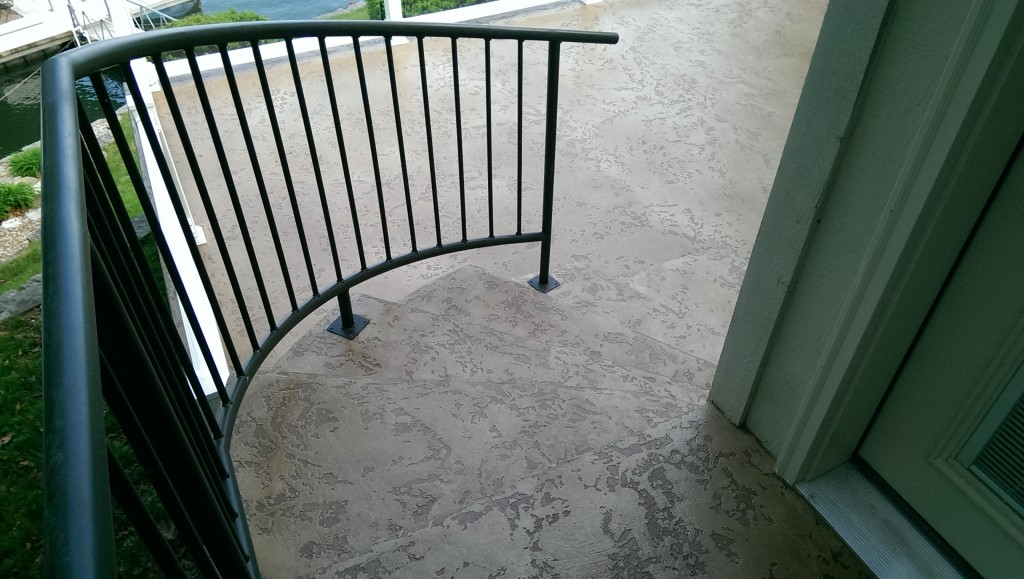 ything on the bottom end (walls, railings, posts anything we did not want concrete on) with a 3/4 inch fiber tape, then spread out the base coat slightly darker chocolate than the top coat, just trying to give the deck a more 3D look. Once the base coat was on it was time to paper off everything that we did not want Acid stain on.
Now its time for the Top coat of concrete everything is taped off and we were ready for the next phase, the top coat Texture is a Tuscan Slate its about a 85 to 90% coverage rate, so we can see the our base coat, now that the Texture coat is on we are ready to start mixing stain and spraying it on, the Acid Stain will sit in the low pockets of the design and darken the base coat a little more plus it Slightly Marbleizes the top coat Tuscan Slate Texture at the same time, really gives it a nice look.
Now its time to apply our premium Sealer, once the 1st coat goes down and soaks in the color starts to really pop, but its the second coat I call the money coat, it brings the SHINE!!
Another Patio saved and Beautified by Custom Concrete Design!
Hope you Enjoy the pictures and Video
MORE pictures located HERE!!
Call me for a FREE Estimate.
OR – You can Fill out this Convenient Contact form located HERE and I will Contact YOU!!
Thank you for Visiting my Website, come back again soon….
Rick LaFata
(573)-216-0930
rick@customconcretedesign.info
Custom Concrete Design
![]()
![]()
![]()
![]()
![]()
![]()
![]()
![]()

Decorative Concrete Resurfacing Pool Deck Lake of the Ozarks Gravois Mill MO
Wow what a Job it was right in the rainiest part of the year, well it wasn’t bad we got through this one, started with some really decent concrete made a few repairs and adjustments here and there, but overall it was a great success.
We did our usual grinding here and there, fixed some cracks, the Leveling was probably the most challenging thank you John Clary from John Clary Concrete in Laurie MO, your help was priceless.
We originally started this Project with hopes to do more than just the pool deck area, but after a late start , some rain and a timeline to get it done we decided to just concentrate on the pool deck alone for now, we will get back over there to get the rest of it done sometime this fall after Coconuts closes for the season, looks like we will have about 5,000 MORE sqft feet to get done then.
Anyway we got our first coat down (dark grout) after a week of prep work it went very smoothly, once we had that down it was time to Hand Tape that Entire pool deck you see, wow it was a job let me tell ya, but we got through it and from there once the pattern was laid down we had to get everything around the entire pool deck masked off to contain the over-spray from the Knockdown Finish that was to be laid down.
Finally we were ready to spray the surface, out first coat went down really smooth, same with the second, next was the highlight coat, we were running out of daylight and pushed it till the last bit of light but we had enough and we got it done, came back a few days later because we had some rain come in.
Last day was clean-up, its so time consuming to mask it off, but pulling it off was a breeze!!…haha.. cleaned the surface really well after we pulled all the pattern tape and removed all the paper, now it was time for sealer!!….The sealer really makes the color pop and adds so much more dimension to any project we do, 2 coats and 8 hours later we were done with sealer and it was time for the Video and photo’s!
Hope you Enjoy the pictures and Video
MORE pictures located HERE!!
Call me for a FREE Estimate.
OR – You can Fill out this Convenient Contact form located HERE and I will Contact YOU!!
Thank you for Visiting my Website, come back again soon….
Rick LaFata
(573)-216-0930
rick@customconcretedesign.info
Custom Concrete Design
