google.com, pub-1613111081024165, DIRECT, f08c47fec0942fa0

Decorative Concrete Flooring Archives

Decorative Concrete Lakeside Patio Deck with Acid Stain in Laurie, MO

With this patio we started out with a pretty good slab of concrete, it had 3 cracks running from the house all the way to the railing, we of course repaired them did a little grinding (just a few rough spots nothing major) and started our Overlay Process.

We did our usual prep work to begin which is always the grinding and repairs, then we go in with a Muriatic Acid wash then an Ammonia Rinse, followed by a soft water rinse, then we hammer the concrete with our 4000 PSI pressure washer and really get those pours of the concrete wide open for our overlay material.

Taped up everIMAG0669
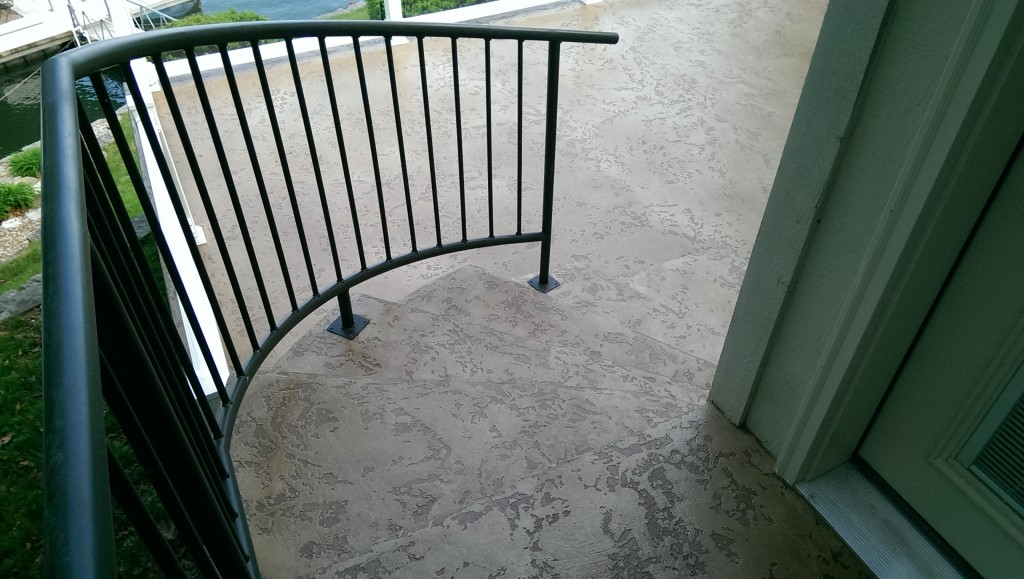
ything on the bottom end (walls, railings, posts anything we did not want concrete on) with a 3/4 inch fiber tape, then spread out the base coat slightly darker chocolate than the top coat, just trying to give the deck a more 3D look. Once the base coat was on it was time to paper off everything that we did not want Acid stain on.

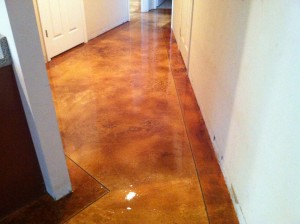
Now its time for the Top coat of concrete everything is taped off and we were ready for the next phase, the top coat Texture is a Tuscan Slate its about a 85 to 90% coverage rate, so we can see the our base coat, now that the Texture coat is on we are ready to start mixing stain and spraying it on, the Acid Stain will sit in the low pockets of the design and darken the base coat a little more plus it Slightly Marbleizes the top coat Tuscan Slate Texture at the same time, really gives it a nice look.

Now its time to apply our premium Sealer, once the 1st coat goes down and soaks in the color starts to really pop, but its the second coat I call the money coat, it brings the SHINE!!

Another Patio saved and Beautified by Custom Concrete Design!

Hope you Enjoy the pictures and Video

MORE pictures located HERE!!

Call me for a FREE Estimate.

OR – You can Fill out this Convenient Contact form located HERE and I will Contact YOU!!

Thank you for Visiting my Website, come back again soon….

Rick LaFata
(573)-216-0930
rick@customconcretedesign.info
Custom Concrete Design

Facebook YouTube Twitter pinterest WordPress Flickr about.me Instagram

image


Decorative Concrete Resurfacing Pool Deck Lake of the Ozarks Gravois Mill MO

Wow what a Job it was right in the rainiest part of the year, well it wasn’t bad we got through this one, started with some really decent concrete made a few repairs and adjustments here and there, but overall it was a great success.

We did our usual grinding here and there, fixed some cracks, the Leveling was probably the most challenging thank you John Clary from John Clary Concrete in Laurie MO, your help was priceless.10155018_10152207076943229_7615070453990164271_n

We originally started this Project with hopes to do more than just the pool deck area, but after a late start , some rain and a timeline to get it done we decided to just concentrate on the pool deck alone for now, we will get back over there to get the rest of it done sometime this fall after Coconuts closes for the season, looks like we will have about 5,000 MORE sqft feet to get done then.

Anyway we got our first coat down (dark grout) after a week of prep work it went very smoothly, once we had that down it was time to Hand Tape that Entire pool deck you see, wow it was a job let me tell ya, but we got through it and from there once the pattern was laid down we had to get everything around the entire pool deck masked off to contain the over-spray from the Knockdown Finish that was to be laid down.

Finally we were ready to spray the surface, out first coat went down really smooth, same with the second, next was the highlight coat, we were running out of  daylight and pushed it till the last bit of light but we had enough and we got it done, came back a few days later because we had some rain come in.

Last day was clean-up, its so time consuming to mask it off, but pulling it off was a breeze!!…haha.. cleaned the surface really well after we pulled all the pattern tape and removed all the paper, now it was time for sealer!!….The sealer really makes the color pop and adds so much more dimension to any project we do, 2 coats and 8 hours later we were done with sealer and it was time for the Video and photo’s!

Hope you Enjoy the pictures and Video

MORE pictures located HERE!!

Call me for a FREE Estimate.

OR – You can Fill out this Convenient Contact form located HERE and I will Contact YOU!!

Thank you for Visiting my Website, come back again soon….

Rick LaFata
(573)-216-0930
rick@customconcretedesign.info
Custom Concrete Design

Epoxy Garage Floor w/Decorative Vinyl Chips Lake of the Ozarks MO

Here’s a Garage floor located in Camdenton Mo at Old Kinderhook, we profiled the entire surface by grinding off the paint and drywall material, cleaned it all up then started our Epoxy Garage Flooring System.

IMAG0234

First we started by applying the Base coat of colored Epoxy which in this case was a light Tan color, once it was down we simply threw out Vinyl Chips (brown, beige, black, white), let it set for the day, came back in on day 3 and put on our protectorthan coat, final day was simply another coat of protectorthan.

Very simple neat and clean job…


MORE pictures located HERE!!

Call me for a FREE Estimate.

OR – You can Fill out this Convenient Contact form located HERE and I will Contact YOU!!

Thank you for Visiting my Website, come back again soon….

Rick LaFata
(573)-216-0930
rick@customconcretedesign.info
Custom Concrete Design


Decorative Concrete Basement Floor Antiqued Charcoal Coloring with Epoxy Finish

Here we have a 640sqft Basement Floor that was in bad shape it had over 300 small and med size holes in the surface from pulling the carpet strips, it had black mastic in both bedrooms that was very stubborn to remove we had to grind the entire surface down the the bare concrete, once the grinding was done we discovered many cracks that were not detected until the grinding was finished, so we repaired all the cracks and there were alot of them. IMAG0134

Once we removed the mastic and repaired the holes and cracks we were able to start our cleanup, after clean up it was time for the base coat of concrete, the base coat went on very nicely and really made the floor look new again!

Next step was to start layering our texture, we did 2 top coats of a slighter lighter in color concrete but this was a 50/50 mixture the mixture we did gave us a less grainy feel and a more creamy smoother finish, coverage was at about 85% coverage, we wanted to create smaller pockets so we could see our first base coat which is basically how a Tuscan Slate finish is done.


IMAG0131

Now that we have Texture it was time to paper everything off from any over-spray because it was time to start spraying our Antiquing Stain onto the floor, once the masking/papering was done we mixed our stain and poured it into a pump up sprayer and proceeded to spray the surface. We had to put 3 Antique coats down to get the correct shade.


It was now time for the High Gloss Epoxy Finish to make the coloring POP!!….The Epoxy went down as expected smooth and efficient and looked AWESOME!!

MORE pictures located HERE!!

Call me for a FREE Estimate.

OR – You can Fill out this Convenient Contact form located HERE and I will Contact YOU!!

Thank you for Visiting my Website, come back again soon….

Rick LaFata
(573)-216-0930
rick@customconcretedesign.info
Custom Concrete Design

Basement Floor Makeover!

We started this basement floor project with alot of prep work, the work included removing carpet, repairing cracks, removing some tile, patching in small holes where the carpet tacks were located along the whole perimeter of the entire floor, and grinding the everything,  so we had our work cut out for us.

IMG_1536Once the prep work was done, we began the Decorative Concrete process, it started with our first base coat which was a very dark chocolate colorant with some charcoal colorant added in, then a second base coat of the same, which is pretty standard. Once the 2 base coats were down we taped out  1/2 inch boarder with our threaded strapping tape which was about 6 1/2 inches from the wall, the reason for the odd width of the boarder was to accommodate the 1/2 inch baseboard that the homeowner would eventually add back on after we were done and they had another coat of paint on the walls, this would bring the boarder to a 6 inch boarder in width around the whole perimeter of the entire concrete surface.
Now its time for more concrete we put a tack coat over the whole surface so that the next color coat would not bleed under the strapping tape, once that coat was on we came back in with 2 White coats of concrete (zero colorant in the concrete). After the first coat was down and dry we prepped the walls with paper and some area’s with plastic, then we proceeded with our second coat which was the texture coat.IMG_1548

Next was the Acid Staining, we wanted 2 coats of acid stain, first coat was a Umber color, sort of a yellow gold color, the second acid stain coat was a brown color, once I got the look I was after we let it dry and do its thing. Once it was dry we came in with an Ammonia wash on the entire floor and shop-vaced the water up, placed our fans on it and let it sit for 2 days and dry out real well over the weekend.

Came back and applied our Premium High Gloss Epoxy Finish to give it that nice super high gloss glass like look say that 5 times really fast :)…. laid it out and squeegeed it around then back rolled it. came back the next day and put down a Scratch Proof urethane coat once dry I shot this Video and snapped a few pictures of the finished look.
The Homeowners were very very happy!


MORE pictures located here.

Call me for a FREE Estimate.

OR – You can Fill out this Convenient Contact form located HERE and I will Contact YOU!!

Thank you for Visiting my Website, come back again soon….

Rick LaFata
(573)-216-0930
rick@customconcretedesign.info
Custom Concrete Design

 Page 9 of 16  « First  ... « 7  8  9  10  11 » ...  Last »